Research and Interpretation of the British Military Knapsack of the American War for Independence.
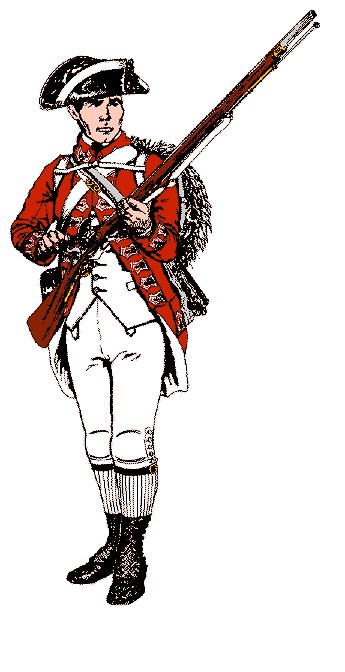
The defining component of our Full Marching Order is the goatskin covered knapsack. Our mascot Tommy Atkins can be seen wearing his as he prepares to load his musket.
The knapsack was intended to contain all of the soldiers' necessary items of clothing and equipment. According to Thomas Simes' 1778 Military Instructor for Non-Commissioned Officers:
"Complement of necessaries, etc., for the soldier. 1 coat, 1 waistcoat, 1 pair of cloth breeches, and another of ticking, 1 hat and cockade, 3 shirts, 2 white stocks and 1 black, 3 pairs of stockings, 2 pairs of shoes, 2 pairs of black linen gaiters and 1 pair of half-gaiters, 2 pair of white linen tops and one pair of black leather tops, 1 forage cap, a ball of pipeclay, 1 stock buckle, one pair shoe-buckles and one pair garter buckles . . ."
Using Pte. Atkins as a model, you can see that he is wearing the linen breeches and short gaiters of his Summer Uniform. That means his woolen breeches and full gaiters are in his knapsack, along with the additional shirts, stockings, blackball, brush, cleaning kit, toilet roll and all his other necessities of life.
Unfortunately for those attempting to re-create the equipment of the British soldier of the American War for Independence, no knapsack has survived which is known to have been used by British regulars during our period. We must therefore base our re-creation on written descriptions, images of soldiers wearing knapsacks, and original knapsacks from slightly later.
Bennet Cuthbertson writes a clear description of a knapsack:
"Article XLII. Square knapsacks are most convenient, for packing up the soldier's necessaries, and should be made with a division, to hold the shoes, black-ball, and brushes, separate from the linen; a certain size must be determined on for the whole, and it will have a pleasing effect upon a march, if care has been taken, to get them all of white goat-skins, with leather sling well whitened, to hang over each shoulder; which method makes the carriage of the knapsack much easier, than across the breast, and by no means so heating."
Even before we determine the exact dimensions of our knapsack, we should address the issue of painted vs. goatskin covered. Although it can be shown that painted knapsacks were being used by British troops as early as April of 1779, when Capt. Peebles of the 42nd "went to Town to see about the painted knapsacks. . .", it can also be shown that goatskin covered knapsacks were being used well into the 1790's. Even as late as 1803 in his The Regimental Companion, Charles James can observe: "White goat-skins are sometimes used, but we do not conceive them to be equal to the painted canvas ones. Soldiers in the British service, are put under heavy stoppages for the payment of their knapsacks, which, after six years, become their property."
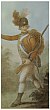
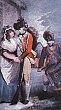
Here we have three images of soldiers from the 1790's wearing goatskin knapsacks. There are contemporary images of soldiers wearing painted knapsacks as well, but these serve to show that goatskin knapsacks were used well after our period.
 |
 |
 |
Even the Americans used goatskin knapsacks:
"Return of Tents and Knapsacks prepared and preparing for the campaign 1781.",
Charles James mention that knapsacks became the soldiers' property after six years suggests that the knapsack was not an item of annual issue. Even given that this was written in 1803, it is reasonable to expect a similar service life in our period. When portraying a British soldier of 1776, you would almost certainly have been issued a goatskin knapsack. That knapsack should have lasted you the five years until 1781. The rigors of campaign may have shortened your knapsack's service life (without however, shortening your stoppages for it!) but it would be the luck of the regimental agent whether you would be issued a painted or goatskin replacement. We know that Lord Cornwallis took better than average care of his troops with regard to clothing and equipment, so it is reasonable to assume that even though the Regimental Agent may have been hampered by the availability (or lack of it) of goat skins, he would most likely have tried to purchase knapsacks matching what had already been issued.
We have elected to cover our knapsacks with goatskin in order to give ourselves the most flexibility with our re-creation. Goatskin is certainly correct for the entire period, whereas painted knapsacks would be unlikely to be seen in the earlier years of the war. Another advantage to goatskin is the impression it makes on the children at our school presentations. The tactile nature of the goat hair ("Can I touch it?") gets a lot of interest, and gives us an entry into the discussion of the personal life of the Redcoat. When determining the dimensions and construction of a knapsack, we have been fortunate to receive help from a number of sources. In his 1998 revision of part 5 of A Military Guide, Vincent J-R Kehoe gave us a good starting point in his article on knapsacks. This is the source for the quote from Charles James. It is also where we found Henry Cooke's scale drawings of the Scarsdale Derby Local Militia knapsack, now in the possession of the Isaac Royall House. We are very grateful to Charles Carpenter for his color photos of the Tenth Regiment N. B. Militia and 97th Invernessshire Regiment knapsacks from the Scottish United Services Museum. We have borrowed images from British Military Uniforms 1768 - 96 by Hew Strachan (also the source for the quotes from Simes and Cuthbertson), and British Infantry of the Napoleonic Wars by Philip J. Haythornthwaite. Lastly, the black and white images of the Tenth Regiment N. B. Militia knapsack are from the Osprey Men-at-Arms British Infantry Equipment 1808 - 1908.
All of the knapsacks share similar construction details. They are made of one long piece of canvas with the ends folded over to form pockets. On top of one end is sewn a second gusseted pocket thus forming a compartmented double pocket. The center has a patch of canvas with a slit in it to allow access for small items. One feature to note about all of the knapsacks is that they use iron, not brass buckles. They each have a double shoulder strap. The 97th and Scarsdale knapsacks' shoulder straps have a buckle at the bottom, the 10th N. B. Militia knapsack's shoulder straps are sewn down on both ends. The 97th and 10th N. B. Militia knapsacks have a chest strap, but there is none visible on the Scarsdale knapsack. The 97th and Scarsdale knapsacks have closing straps with buckles all around, whereas the 10th N. B. Militia knapsack has three straps and buckles on the bottom edge only. The straps on the 97th Regiment knapsack appear to be tanned leather; the straps on the 10th N. B. Militia knapsack look like buff leather. The Scarsdale knapsack's straps are described as "white buff leather".
Our knapsack is a composite of design features on all three knapsacks studied. It is made to the dimensions of the Scarsdale Derby Local Militia knapsack (as measured and drawn by Henry Cooke) with the shoulder and blanket tie strap arrangement of the 10th Regiment N. B. Militia knapsack. The pocket flaps have two buttonholes in them, like the Scarsdale and 97th Invernessshire Regiment knapsacks.The canvas we used for our initial run of knapsacks was from three bolts of 1959 dated "Pure Flax" grey linen canvas which were rescued from the rubbish at St. Peter's School in York. The canvas is 24" wide. Interestingly, the knapsack body pieces and the pocket flap pieces fit exactly across the width of the fabric, with no wastage. For the shoulder, chest, and closing straps we use a thick, cream colored buff leather. The buckles are hand forged iron. The blanket tie straps are cut from 4oz. tanned leather. The outer surface of the knapsack is partially covered by white goatskin. The part of the knapsack which rests against the soldier's back is left plain canvas.
The main body of the knapsack is a single panel of canvas 19" by 60". On the pattern you will see lines 1/2" from each edge. They represent where the canvas is folded to the inside. The two short ends of the body panel will be folded twice, 1/4" and then again 1/4" in order to make a finished edge which will end up as the top edge of the pockets. Stitch it with a running stitch of around 6 stitches per inch. We use heavy cotton button and carpet thread in a moss brown color. A heavy linen thread would be ideal, but be sure that it has a smooth enough finish to permit it to be drawn through the many layers of canvas. Fold the long sides to the inside 1/2". This edge ends up on the inside and does not need to be folded twice.
Prepare the pocket flaps by finishing three of the four sides. If you look at the pattern, you will see that the top edge of the pocket flap should have a selvedge edge. If you can lay your fabric out so that the pocket flap uses the selvedge edge, remember to line up the selvedge on the fold line. You only make a fold on this edge if you cannot use the selvedge. Fold the edges in 1/4" and then again 1/4" in order to make a finished edge. Leave the bottom edge unfinished - that edge will be sewn under the edge of the center pocket. Mark and work the two buttonholes. Set aside the pocket flaps for now. Slash the slit in the center pocket. Fold the edges back and stitch them in place with your by now all too familiar running stitch. Bar tack the ends. Fold the four edges of the center pocket to the inside. Place the center pocket on the knapsack body, wrong sides together. Line up the centerline of the pocket with the centerline of the knapsack body at the arrowhead mark on the pattern. Stitch the center pocket to the knapsack body along one edge. Note where the shoulder strap reinforce is on the pattern. Center the pocket flap on the side opposite the shoulder strap reinforce onto the knapsack body, lining it up so that 1/2" of it will be caught under the center pocket as you stitch the center pocket to the knapsack body. Continue to stitch the center pocket to the knapsack body, stitching the pocket flap in as you go. Reinforce the pocket flap with a small bar tack where the side tucks under the pocket flap. Once you have finished with the first center pocket/pocket flap seam, stitch the other edge to the knapsack. Leave the remaining side of the center pocket open for now.
To make the two flat pockets, fold the ends of the knapsack body to the inside on the fold lines marked on the pattern. Bar tack the top corners of each pocket. Sew the edges using a running stitch. If you are feeling energetic, you can stitch in the blanket tie straps as you go. You should oil them before you sew them in. It will be easier now than later, and it will help prolong their life.
The best views of the gusset pocket are the one on this page and the bottom view on page 3. Make a finished edge for the top of the gusset pocket, and fold the other three edges to the inside. The gusset pocket has a double fold in it. Each pleat is 1 1/2" deep for a total spread of 3". Once you have folded in the four edges of the gusset pocket, fold the gusset portion of the pocket to the inside then back on itself, making a "Z" pleat.
Stitch the pleat to itself. You can see this in the photo below. One portion of the edge of the gusset pocket is sticking straight up. The sides of this edge portion have been stitched together, taking up three inches of the length of the gusset pocket, and making it so the gusset pocket takes up the same space on the knapsack body as the flat pocket underneath it.
Stitch the gusset pocket to the knapsack body, lining it up directly over the flat pocket. Make sure you don't confuse which pocket to stitch it over - you will be stitching it over a pocket that does not yet have its flap. Again, if you wish you can stitch the blanket ties in as you go. In any case, you want to put the blanket ties on before you put the goatskin on. Don't go any tighter than six stitches per inch when sewing on the blanket ties. If you put your stitches too close together the leather will tear like a postage stamp.
Now that all of the pockets and blanket ties are assembled, it is time to put the goatskin on. First, you need to cut out the goatskin panel. Lay the goatskin face down on your cutting table. You will need a piece 18" by 22". Don't cut the goatskin with scissors! Instead, use a knife or razor blade to cut the flesh side of the skin. Pull off as much loose hair as will gently come off the sides. Line up the long edge and one side with the knapsack body. Important! The goatskin goes on the side with the flat pocket, not the gusseted pocket! Whipstitch the long edge and one side. You may have to trim the other side to fit. Whipstitch the other edge, then the long edge which runs across the knapsack body.There is a stitching line on the pattern of the knapsack main body panel to use as a guide where the goatskin is sewn across the knapsack body.
With the goatskin on, you are ready to sew on the buff leather straps. First, prepare the chest strap by fitting the buckle to its end, folding it over on itself and trapping the keeper in. Then fold the strap over on itself around the shoulder strap. You want the buckle end on the wearer's left, with the pointed longer strap on the wearer's right.
The shoulder strap is sewn to the knapsack near the middle of the knapsack body at the places shown on the pattern. It will be stitched through two layers of leather, a layer of canvas and a layer of goatskin. Now, you are really glad you left one side of the center pocket open! ItŐs almost impossible to get to otherwise. Stitch it well and true - these two sites take most of the weight and strain of the knapsack. Once the top ends of the shoulder straps are sewn in, you can finish off the center pocket and the other pocket flap.
The knapsack closing straps are sewn to the bottom of the knapsack at the points shown on the pattern. Note that the buckle ends are sewn on one side of the gusset, and the bottom end of the shoulder straps are sewn on the other side. (see the bottom photo on page 3)
If you want a custom fit, try the loaded knapsack on the soldier, holding the bottom ends of the shoulder strap in place until a good fit is found. The shoulder strap lengths shown in the pattern have field tested well with the 33rd.
If you didn't whiten the leather before you sewed it on, you should do it before your first inspection in your new knapsack. Whiten the outer surface of the straps only! Not the edges, not the back. The original belting which seved as a model for our shoulder belts and bayonet frogs was whitened on the outer surface only.
Put your rack number on your knapsack and wear it well! Take care of it - it will be six years of stoppages from your pay before you own it . . .